


The Handover Checklist Template for Excel You’ll Ever Need: Streamlining Transitions
Handing over responsibilities, whether it’s a project, a role, or even just a daily task, can be a complex undertaking. Without a structured approach, vital information can slip through the cracks, leading to confusion, delays, and potential errors. That’s where a comprehensive handover checklist comes in, and what better tool to build it than the familiar and versatile Microsoft Excel? This article will guide you through creating and utilizing the handover checklist template for Excel you’ll ever need, ensuring smooth transitions and successful outcomes.
Why a Handover Checklist is Essential
Before diving into the template itself, let’s understand the core benefits of using a handover checklist:
- Reduces Errors: Ensures all critical information is documented and transferred, minimizing the chance of mistakes.
- Improves Efficiency: Saves time and effort by providing a clear, organized framework for the handover process.
- Enhances Communication: Facilitates effective communication between the person handing over and the person receiving the responsibilities.
- Promotes Accountability: Clearly defines responsibilities and tracks progress, fostering accountability for both parties.
- Ensures Consistency: Standardizes the handover process, guaranteeing consistent information transfer across different situations.
- Minimizes Knowledge Loss: Preserves institutional knowledge, preventing critical information from being lost during personnel changes or project transitions.
Building Your Ultimate Handover Checklist Template in Excel
The beauty of Excel lies in its flexibility. You can tailor your handover checklist to suit your specific needs. Here’s a suggested structure, along with tips for customization:
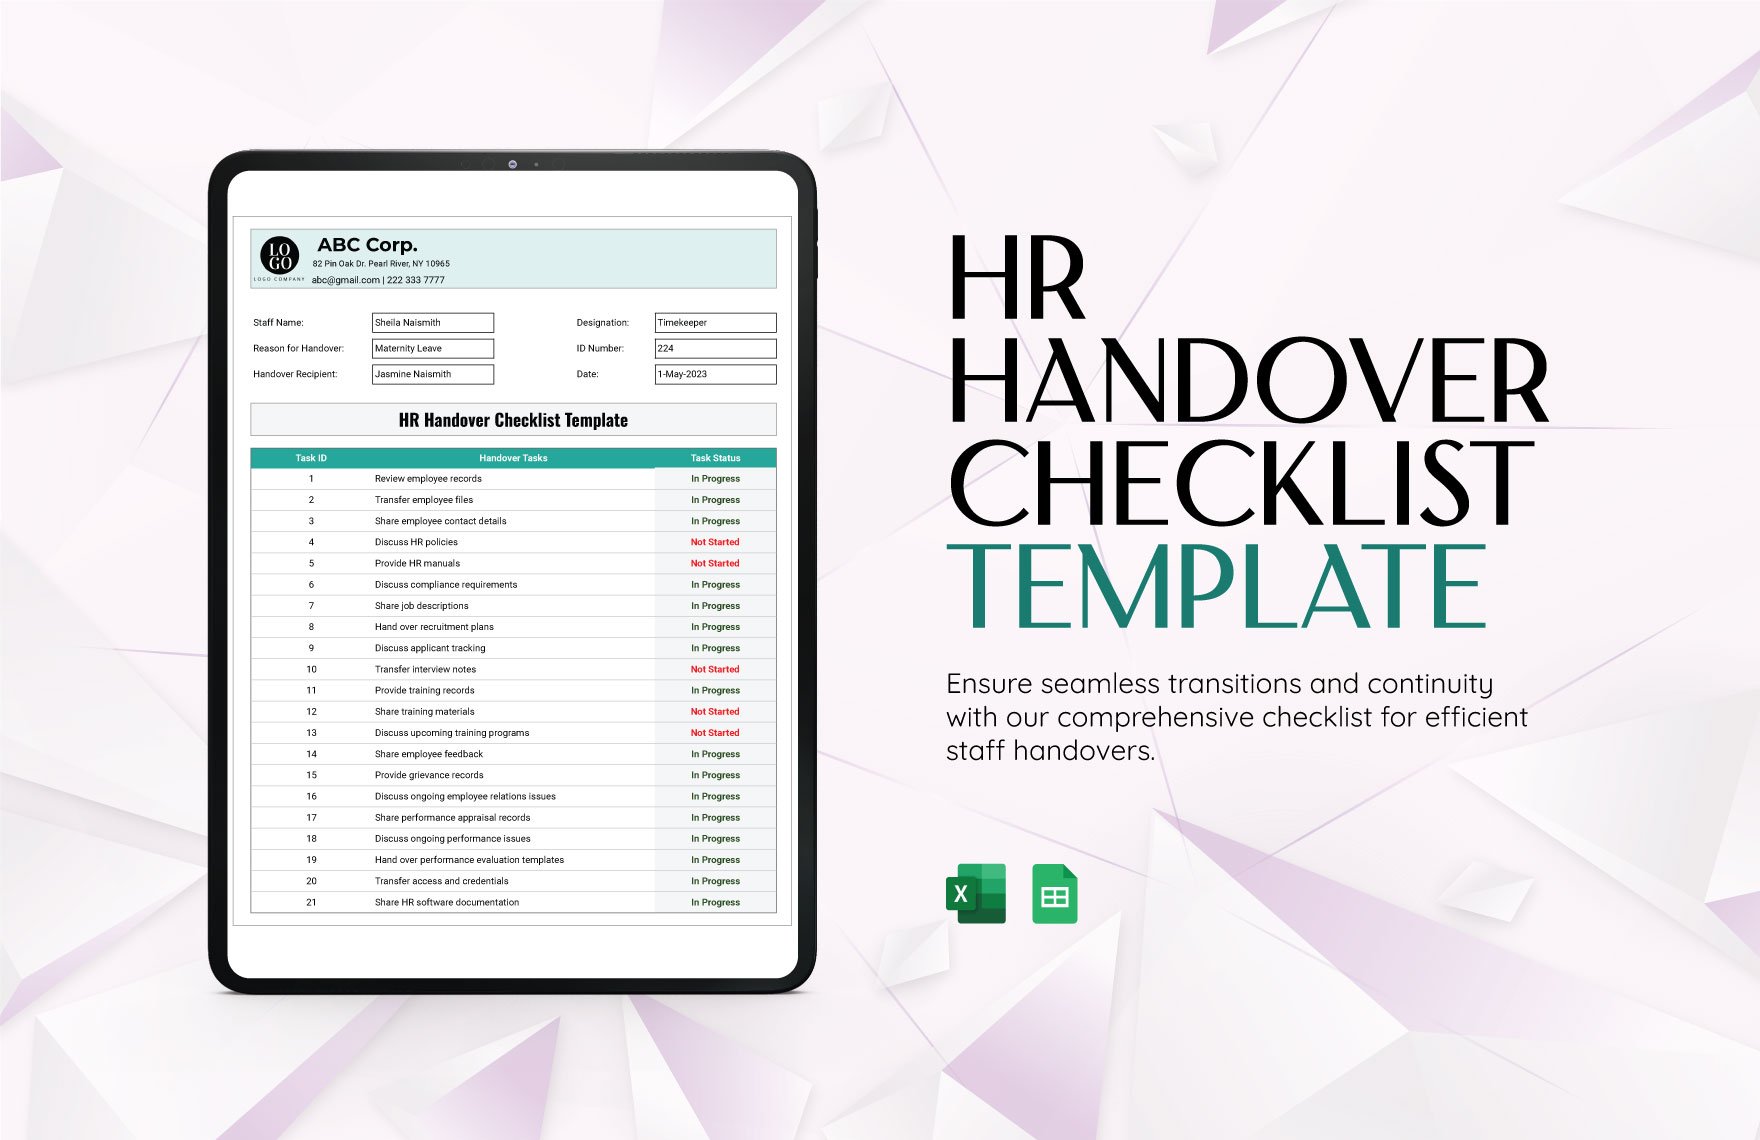
1. Header Section:
- Project/Task Name: Clearly identify the subject of the handover.
- Handover Date: Date the checklist is being used.
- Handover Person: Name of the person transferring the responsibilities.
- Recipient: Name of the person receiving the responsibilities.
- Department/Team: Relevant department or team information.
- Contact Information (Handover & Recipient): Phone numbers, email addresses.
2. Checklist Items - The Core of Your Template:
This is where the detailed information resides. Consider these categories and examples for each:
- Tasks & Responsibilities:
- Complete task X.
- Submit report Y.
- Attend meeting Z.
- Manage customer accounts A, B, and C.
- Documentation & Resources:
- Link to project documentation (e.g., shared drive, intranet).
- Access details for relevant systems (e.g., username, password, URL).
- Contact information for key stakeholders.
- Instructions for using specific software or tools.
- List of any required documents.
- Deadlines & Timelines:
- Due date for each task.
- Key milestones.
- Reporting schedules.
- Ongoing Issues & Known Problems:
- Document any current challenges or outstanding issues.
- Include relevant details (e.g., steps taken, potential solutions).
- Note any workarounds or temporary solutions.
- Training & Support:
- Schedule for training sessions.
- Contact details for support personnel.
- Links to training materials.
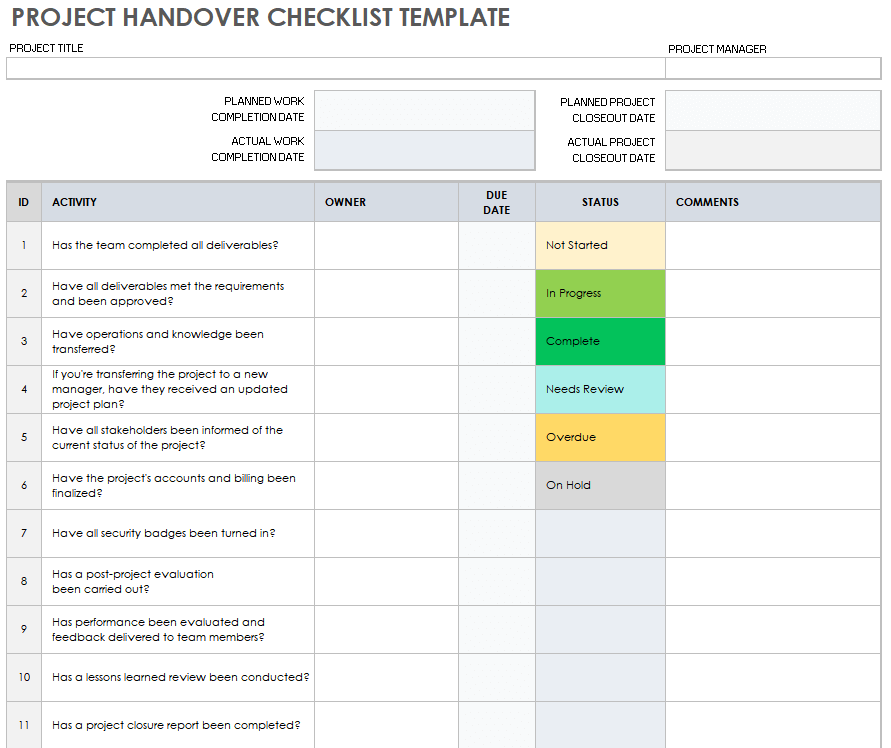
- Status & Notes:
- “Not Started,” “In Progress,” “Completed,” “Pending.”
- Space for comments and notes on each item.
- Sign-off column for both the handover person and the recipient.
3. Excel Features to Enhance Your Template:
- Conditional Formatting: Use conditional formatting to highlight items based on their status (e.g., red for “Not Started,” green for “Completed”). This provides a visual overview of progress.
- Data Validation: Use data validation to create dropdown lists for status, making data entry quicker and more consistent.
- Formulas: Utilize formulas to automatically calculate completion percentages or track deadlines.
- Protection: Protect the worksheet to prevent accidental modifications to critical formulas or data.
- Filtering: Enable filtering to easily sort and view specific tasks or items.
- Comments: Add comments to individual cells for detailed explanations or context.
Customizing Your Template for Different Scenarios
The beauty of an Excel template is its adaptability. Here’s how to tailor it:
- Project Handover: Include specific tasks related to project deliverables, deadlines, and stakeholders.
- Role Handover: Focus on responsibilities, access rights, and ongoing tasks specific to the role.
- Daily Task Handover: Simplify the template for recurring tasks, including deadlines, required resources, and any urgent issues.
- Team Handover: Address team-specific responsibilities, communication channels, and team member roles.
Best Practices for Using Your Handover Checklist Template
- Be Thorough: Include all relevant information, even seemingly minor details.
- Be Clear and Concise: Use clear language and avoid jargon.
- Regularly Update: Keep the checklist up-to-date throughout the handover process.
- Communicate Regularly: Maintain open communication between the handover person and the recipient.
- Review and Revise: After each handover, review and revise the template based on lessons learned.
- Save and Share: Save the template in a shared location (e.g., shared drive, cloud storage) for easy access.
Conclusion: Empowering Smooth Transitions with Excel
By utilizing a well-designed handover checklist template in Excel, you can significantly improve the efficiency and effectiveness of any transition. This guide provides a comprehensive framework to get you started, ensuring that vital information is captured, communicated, and ultimately, helps ensure successful outcomes. Remember to adapt the template to your specific needs and continuously refine it based on your experience. With a little effort, your handover process will become a streamlined and stress-free experience.
Frequently Asked Questions (FAQs)
1. Where should I store the Excel handover checklist template?
Store the template in a central, easily accessible location for both the handover person and the recipient. This could be a shared network drive, a cloud storage service (like Google Drive or Dropbox), or a dedicated project management platform. Consider version control to track changes.
2. How often should I update the handover checklist?
Update the checklist regularly, ideally throughout the handover process. As tasks are completed, new information arises, or changes occur, update the checklist to reflect the latest status. Daily updates are crucial for dynamic projects.
3. What if the handover is complex and involves many tasks?
For complex handovers, break down the checklist into logical sections or categories. You may also consider using multiple tabs within the Excel file to organize different aspects of the handover (e.g., tasks, documentation, training). Consider using a separate template for each phase of the process.
4. Can I automate the handover process with Excel?
Excel offers limited automation capabilities. You can use formulas, conditional formatting, and data validation to automate certain aspects, such as calculating completion percentages or highlighting overdue tasks. For more advanced automation, consider integrating your checklist with project management software or using VBA (Visual Basic for Applications) scripting within Excel.
5. Is there a way to track the progress of the handover?
Absolutely! Include a “Status” column with options like “Not Started,” “In Progress,” and “Completed.” Use conditional formatting to visually highlight the status of each item. You can also add a progress bar or a completion percentage calculation to track overall progress. Ensure both the handover person and the recipient sign off the completed items.
